The location indicator controls display a configurable axis in the main 3D display and (optionally) a bearing point. This option can be found in the Main Display window under the Display->Add Location Indicator menu. The Location Indicator window consists of three tabs: Location, Settings, and Orient.
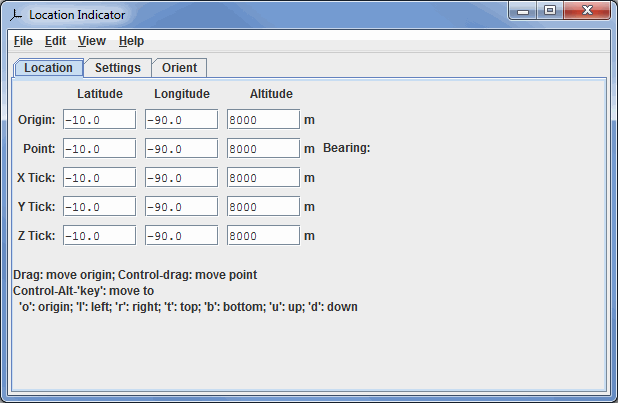
The Location tab displays and allows you to modify the position of the origin and the bearing point:

Image 1: Location Tab of the Location Indicator Dialog
- Origin - Represents the latitude, longitude, and altitude of the origin point in the Main Display window.
- Point - Represents the latitude, longitude, and altitude to set the location of the bearing point in the Main Display window.
- Bearing - Lists the bearing point degree.
- X Tick - Sets the location of the X tick mark in the Main Display window.
- Y Tick - Sets the location of the Y tick mark in the Main Display window.
- Z Tick - Sets the location of the Z tick mark in the Main Display window.
The center point of the Location Indicator can be moved by left-clicking and dragging on the lines produced in the Main Display window. You can also move the center point of the Location Indicator with a series of Ctrl+Alt key combinations.
- Ctrl+Alt+o - Moves the center point of the Location Indicator to the origin (center in the x, y, and z-axes) of the display.
- Ctrl+Alt+l - Moves the center point of the Location Indicator to the left side of the display (in the x-axis), maintaining the previously existing top/bottom and up/down positions.
- Ctrl+Alt+r - Moves the center point of the Location Indicator to the right side of the display (in the x-axis), maintaining the previously existing top/bottom and up/down positions.
- Ctrl+Alt+t - Moves the center point of the Location Indicator to the top of the display (in the y-axis), maintaining the previously existing left/right and up/down positions.
- Ctrl+Alt+b - Moves the center point of the Location Indicator to the bottom of the display (in the y-axis), maintaining the previously existing left/right and up/down positions.
- Ctrl+Alt+u - Moves the center point of the Location Indicator vertically (in the z-axis) to the top of the display, maintaining the previously existing left/right and top/bottom positions.
- Ctrl+Alt+d - Moves the center point of the Location Indicator vertically (in the z-axis) to the bottom of the display, maintaining the previously existing left/right and top/bottom positions.
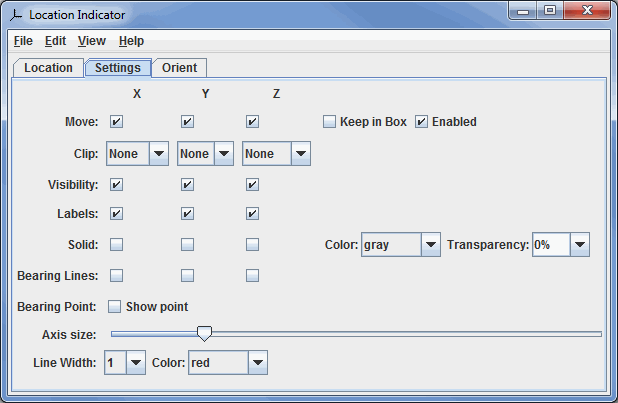
The Settings tab allows for the configuration of display settings:

Image 2: Settings Tab of the Location Indicator Dialog
- Move - Constrains along which axis the center point of the Location Indicator can be moved.
- Keep in Box - Constrains the movement to be within the main 3D bounding box.
- Enabled - Enables the option to drag points.
- Clip - Clips the Location Indicator as well as the display in the Main Display window in relation to the center point of the Location Indicator.
- Visibility - Turns on/off the visibility of the X, Y, and Z axes in the Main Display window.
- Labels - Turns on/off the visibility of the X, Y, and Z labels in the Main Display window.
- Solid - Shades in the plane of any of the axes selected. You can select a color and a transparency for this plane.
- Bearing Lines - Shows or hides the bearing lines. These are dashed lines from the respective axis to the bearing point.
- Bearing Point - Turns on/off the display of the bearing point.
- Axis size - Expands/contracts the length of the origin axis.
- Line Width - Sets the line width of the Location Indicator lines.
- Color - Sets the color of the Location Indicator lines.
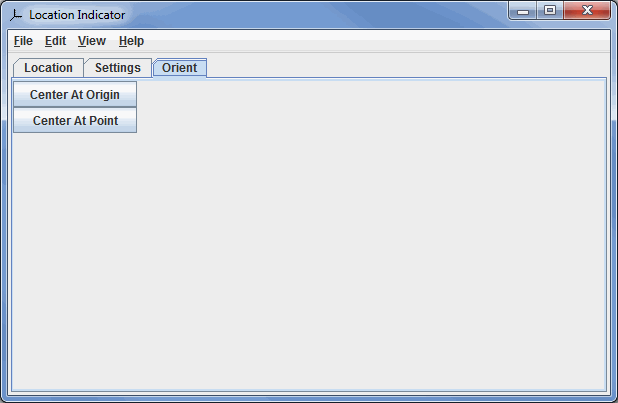
The Orient tab allows for the orienting the display based on the location. To change the origin, click and drag in the main display. To show and/or change the bearing point, do a Control+drag in the Main Display window. The x/y/z locations of the bearing point are shown on the origin axis as tick marks and, optionally, as longitude/latitude/altitude readouts:

Image 3: Orient Tab of the Location Indicator Dialog
- Center At Origin - Centers the display at the origin of the Location Indicator.
- Center At Point - Centers the display at the center of the image, not taking into account the location of the center point of the Location Indicator.
Many of the menu items seen utilizing this display are standard options that can be found in the Menus section of the Layer Controls Page. However, there are some options that are unique to this display.
The Edit menu has this unique option:
- Selector Color - Changes the color of the Location Indicator display in the Main Display window.
The View menu has these unique options:
- Set origin to address - Changes the location of the origin to a given address, zip code, city, etc. See the Go to Address section of the Display Menus page for more information.
- Set point to address - Changes the location of the point to a given address, zip code, city, etc. See the Go to Address section of the Display Menus page for more information.