| Input Parameter | Definition | |
Channel0p64 |
ABI Band 2 (0.64um). |
|
Channel0p86 |
ABI Band 3 (0.86um). |
|
Channel0p47 |
ABI Band 1 (0.47um). |
|
| Input Parameter | Definition | |
Upper Left Lat |
Upper left latitude value (default=90). |
|
Upper Left Lon |
Upper left longitude value (default=-180). |
|
Lower Right Lat |
Lower right latitude value (default=-90). |
|
Lower Right Lon |
Lower right longitude value (default=180). |
|
| Input Parameter | Definition | |
comparison |
The mathematical operator applied to the cutoff value to determine which data values are displayed. |
|
cutoff |
The numerical boundary that will be applied to the comparison value. |
|
useNaN |
Default value = 1. When 0, values outside data will be 0, when 1, values outside data will be unprobeable. |
|
| Input Parameter | Definition | |
minValue |
The minimum data value that will be displayed. |
|
maxValue |
The maximum data value that will be displayed. |
|
useNan |
Default value = 0. When 0, values outside data will be 0, when 1, values outside data will be unprobeable. |
|

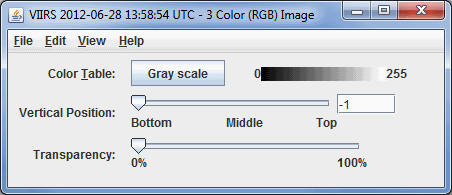
Image 1: Three Color (RGB) Image
- Color Table - Shows the active color table and the associated high and low data values in the units of the display. As the mouse pointer is moved over the color bar, the value at a particular color is shown. Right-click on the color bar or click on the button that displays the name of the Color Table to make modifications to the color bar. This allows you to open the Color Table Editor, change the range, select other color tables, etc.
- Vertical Position - Changes the vertical position of the image with respect to other variables being displayed in the Main Display window. You can change this with the slider, or by entering a value into the field and pressing Enter.
- Transparency - Increases or decreases the transparency of the image.

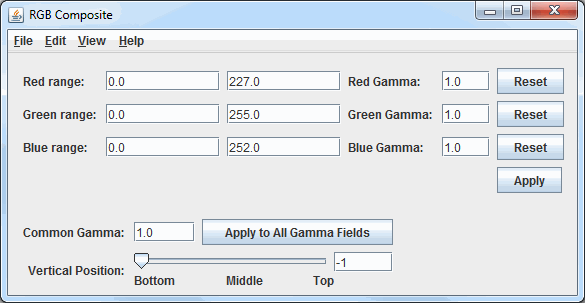
Image 2: RGB Composite Controls
- Red range - Sets the minimum and maximum values for the red range, as well as the gamma value.
- Green range - Sets the minimum and maximum values for the green range, as well as the gamma value.
- Blue range - Sets the minimum and maximum values for the blue range, as well as the gamma value.
- Gamma - Sets a gamma value that is applied to all three colors. To apply one gamma value to all RGB gammas, enter a value into this field and press Enter or click
 . A gamma value less than 1 will lead to the display being weighted toward higher (brighter) output values. A gamma value greater than 1 will lead to darker output.
  - Resets the minimum and maximum range as well as gamma values for the color to their defaults.
-
 - Applies any changes that have been made to any of the fields of the individual R, G, and B components to the image in the Main Display window. This button does not affect the bottom Gamma value. Alternatively, after changing a value in each field, you may press Enter to apply your change to the image.
  - Applies a Common Gamma value to all red, green, and blue gamma fields.
- Vertical Position - Sets the vertical position of the layer in the Main Display.