Display Window Preferences
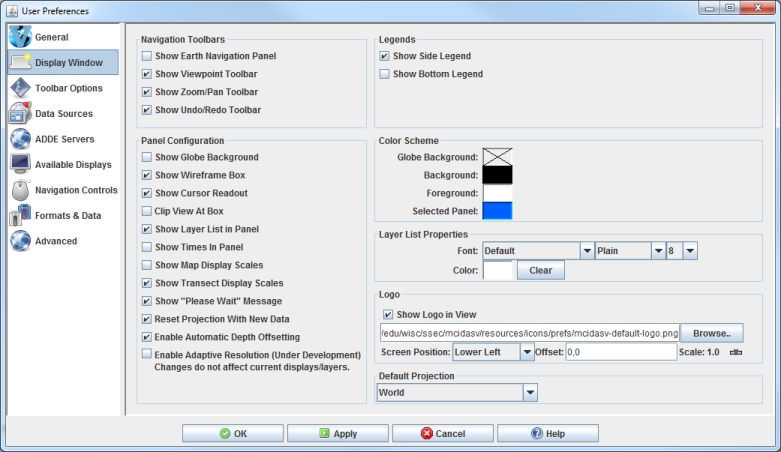
The User Preferences window is accessed in the Main Display window through the Edit->Preferences menu. The Display Window tab allows the user to set preferences related to the Main Display window. The image below represents the default settings for the Display Window tab.
 Image 1: Display Window Preferences (Default)
Legends
- Show Side Legend - Lists the loaded layers into the Legend of the Main Display window. Note that you must create a new tab/window for a change to this preference to take effect.
- Show Bottom Legend - Lists the loaded layers in a Legend at the bottom of the Main Display window. Note that you must create a new tab/window for a change to this preference to take effect.
Panel Configuration
- Show Globe Background - Displays a solid globe background.
- Show Wireframe Box - Toggles the visibility of a 3D wireframe box around the data. This box helps provide orientation in 3D views.
- Show Cursor Readout - Displays a label of latitude, longitude, and altitude at the cursor position over the display, shown in the lower border of the Main Display window.
- Clip View At Box - Allows the user to omit from view all display elements outside the wireframe box. This is helpful to remove map lines outside the area of data.
- Show Layer List in Panel - Shows/hides the Layer Label at the bottom of the display panel.
- Show Times In Panel - Adds a label to the display panel that shows the current animation time and step in the loop.
- Show Map Display Scales - Adds vertical and horizontal scales to the wireframe box in the display panel.
- Show Transect Display Scales - Shows a vertical scale for transect displays.
- Show "Please Wait" Message - Displays a "Please Wait" message in the bottom left of the display panel when McIDAS-V is in the middle of a process.
- Reset Projection With New Data - Changes the projection to match the native projection of the newest data source added. This can be undesirable when overlaying several kinds of data, some of which have differing projections. However, it works well when working with data based on the same projection. Another option related to this is Auto-Set Projection.
- Enable Automatic Depth Offsetting - Displays overlapping layers of differing resolutions in a way that there is no display interference when the display is rotated.
- Enable Adaptive Resolution (Under Development) - Toggles adaptive resolution to be active or inactive for the session as a whole. If active, then any layers capable of utilizing adaptive resolution will use it. If inactive, then no layers will use adaptive resolution. Note that this feature is still under development. Any change to this setting will take affect for only new display panels created in the session. For more information, see Adaptive Resolution.
Color Scheme
- Globe Background - Sets the color of the globe's background.
- Background - Sets the color of the background behind the image being displayed.
- Foreground - Sets the color of the wireframe box in the foreground.
- Selected Panel - Sets the color in the frame around the selected panel/tab. This is the panel/tab that changes will be made to if you have multiple tabs open.
- Note: The color of the maps is controlled by the individual map control. The selected panel color changes the color used to highlight the current panel.
Layer List Properties
- Font - Sets the style of the text at the bottom of the display panel listing the layers. Using the dropdown lists, the user can define the font, style, and size of text.
- Color - Sets the color of the text at the bottom of the display panel.
Logo
- Show Logo in View - Sets the visibility of the logo in the display panel.
- File - Sets the logo file to use. This can be an image file with the form of *.jpg, *.gif, or *.png.
- Screen Position - Sets the position of the logo in the display panel. This can be Lower Left, Upper Left, Upper Right, Lower Right, or Center.
- Offset - Sets the x,y pixel offset value from the Screen Position field. For example, to place a logo in the lower left of the display, but with a 10 pixel offset between the logo and the boarder of the window, you can specify a Screen Position of Lower Left with an Offset of 10,-10.
- Scale - Sets the size of the logo in the display. A Scale of 1 would be the actual size of the image, anything less than 1 will scale the image down to make it smaller, and values greater than 1 will scale the image up to make it larger.
Default Projection
- Default Projection - Sets the default map projection.
This is the map projection that will be used in the display panel when McIDAS-V is started.

